

 Good Morning, Quilters, Doodlers and Collectors!
I really enjoyed reading about all of YOUR collections on Open Line Friday last week.
I did have a favorite though–Eliz, the quilter whose HUSBAND collects sewing machines and has more than 55 machines stashed everywhere! I wonder if my husband has a Featherweight or two stashed somewhere???
POPPIES-The Free Motion Quilt Tutorial
I have decided to challenge myself to work a little larger with my free motion quilting. The Poppy tutorial is part of that challenge.
This motif looks very nice on a small scale, but it also looks great when stitched much larger. I think I could make a very large whole cloth quilt in no time at all just filled with a field of poppies. Wouldn’t it be a great quick project? I’m going to wait for a rainy, day where I have nothing else to do….??? Okay, maybe just a rainy day…
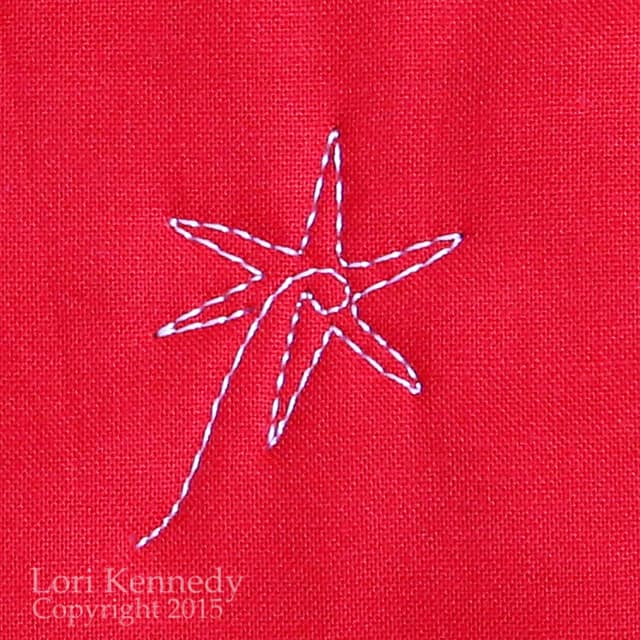
I just LOVE the color RED…Hmmm….Maybe I’ll just cancel life tomorrow and stitch this right up… Begin by stitch a short stem with a curl.
 Stitch several pointed rays around the spiral-it doesn’t matter how many.
 Stitch clockwise around the star back to the stem. This row is just a shaggy line around the star.
 Stitch counter clockwise, another shaggy circle.
 For the next row, add rectangular shaped petals. Between each petal create a small “v” shape.
 Continue stitching rows of petals and then spiral off to begin another Poppy.
 Stitch a few small Poppies in between the large Poppies and add a leaf or a swirls to fill in the space.
 Once you get going, you won’t want to stop…
This could be an excuse to pull out the crockpot!
Happy Stitching,
Lori
PS…This tutorial was stitched on my BERNINA 770 QE with it’s fabulous tension adjustment and gorgeous looking stitch using Aurifil 50 wt cotton in the bobbin and Superior’s Magnifico Trilobal Polyester on top using a size 90 Topstitch needle.
PPS…All tutorials, images and information are the property of Lori Kennedy at The Inbox Jaunt and are intended for personal use only. Feel free to re-blog, share or Pin with attribution to The Inbox Jaunt. For all other purposes, please contact me at lckennedy@hotmail.com. Thanks!
17 comments
Beatrice Gren
I love ur designs ! They are cute .
pamelaquilts
What a pretty design!
Tina
I love it, going to try it!! xxxx
Gloria
Thanks! This inspired me to make a variation of this on my quilt. If you would like to see it I posted about it on my blog feelingsofquilt
WordPress.com Support
So pretty! Love how you added the leaves in the corners!
adaisygarden
So pretty. …I have so much more practicing to do before I can do this! haha
Trish
I love this. I think I will try this out this weekend. I have a difficult time going from one design to the next – I think my brain has a little hick-up and the next one starts out shaky but I think I can do this one without too much problem. Thanks for the tute.
Melisa
I love your perspective on all things nature! You shaped the bud beautifully and I could almost see them opening up! Love, love, love your style! Trying to create mine by mimicking yours!
Rebecca Grace
Your poppies are lovely, Lori! I especially love the little buds interspersed amongst the blooms. Those little details are what make an allover design like this one look custom versus pantograph.
Karen
I love that you can see things in just simple lines. Thank you for your visions.
Ness
I adore poppies. This one looks fun! Also that really is a great looking stitch!
Roxanne
Love this and I can tell you are really loving that new 770! Isn’t that larger throat space amazing?
Lori Kennedy
It’s a great machine! Just love everything about it!
treadlemusic
Once you get used to the “thinking large” process, it’s really fun and, I’ve found, that it takes a bit of thought to reverse and go back to the “small” motifs!!! LOL! On a larger project, the more open/larger designs are so much softer/drapier and easier to get even coverage on an E2E (Edge to Edge) stitching pattern. Love this motif!!!!!!
Lori Kennedy
The only problem is the bindings are larger, too!
lavonne
boy I like this one. Need to think of something to put it on.
Lori Kennedy
Just plain red fabric!
Comments are closed.