

 Good Morning, Quilters! It’s time for another Tuesday Tutorial and we are glad you are here!
 Welcome to all the new followers from The Quilting Board-and thank you to Tartan and Sparky’s Mom who both posted photos of their projects on the Quilting Board. Tartan used The Oak Leaf Tutorial to stitch this gorgeous table topper. (See tutorial HERE)

And Sparky’s Mom made this adorable Mug Rug with The Perfect Pumpkin tutorial. (See the tutorial HERE)

Thanks to you both for sharing your photos and your lovely projects!
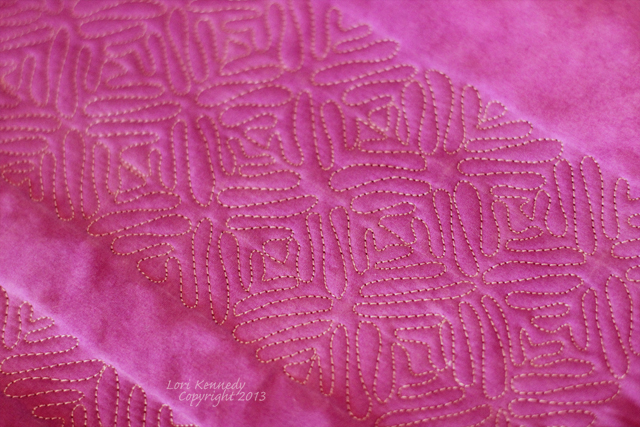
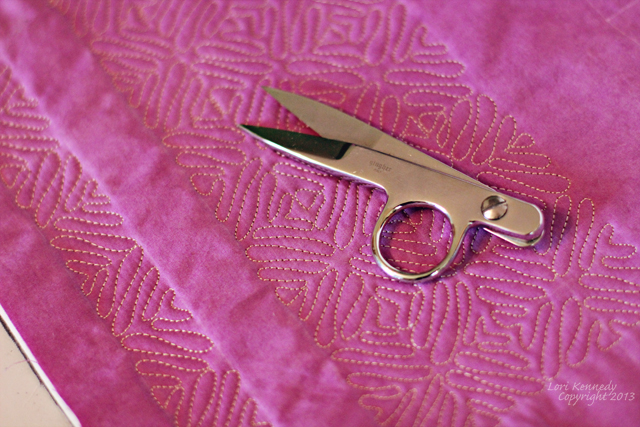
Today we have another easy and fun free motion quilting tutorial for you to try either on your domestic sewing machine like I have– ( I stitch on a Bernina 820 or a Bernina 150 Quilter’s Edition) –or on your long arm. Today, we will be stitching The Squiggle Square. The Squiggle Square can be stitched as a border or as a fill pattern on any quilt. It can look modern or it can look sweet depending on its placement within the quilt and the scale of the square. I recently stitched on the back of a modern pillow-in a large scale and it looked great! Try it on your next quilt–I know you will have fun with this one!

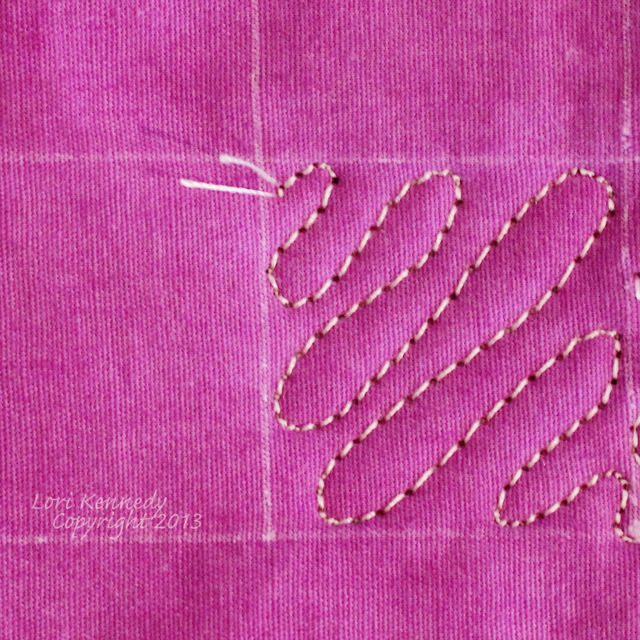
Begin by drawing two (or more) lines. In the sample below, the lines are one inch apart. Then draw perpendicular lines the same width apart. (For the sample below, the perpendicular lines are also one inch apart.)
Begin stitching in one corner and stitch a squiggly line on a diagonal.

Continue “squiggling” back and forth until you fill the square.
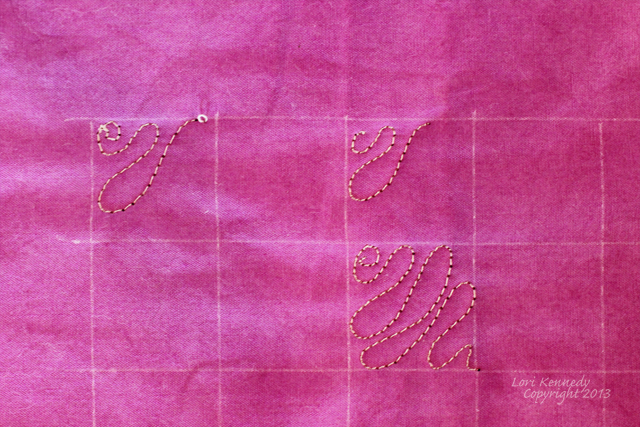
Once the square is filled, “scoot” into the adjacent square and begin “squiggling” in the opposite direction to fill the box.
Continue this process until the row is complete. This makes a great border pattern and pairs well with curvy motifs like the Oak Leaf or the Spiral.

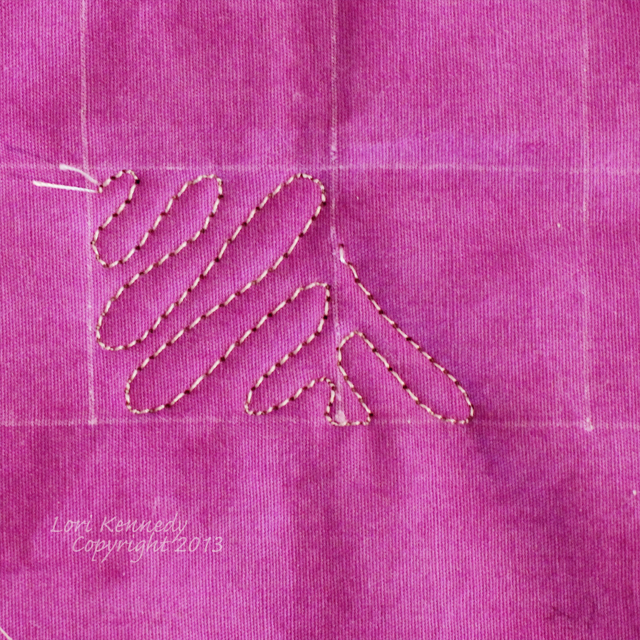
If you’d like to fill a larger space or make a double border, simply add another row on top of the first row.
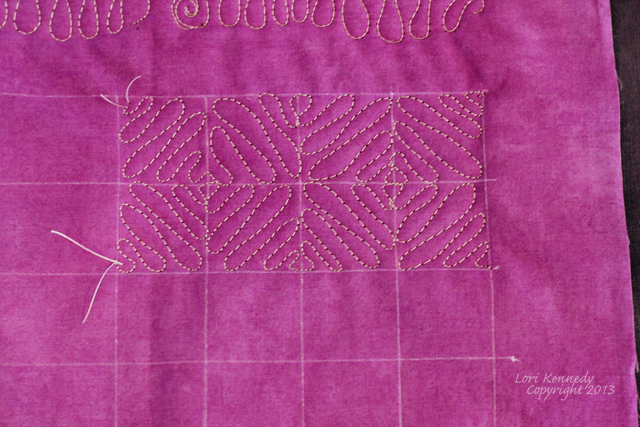
By adding a second row, a complex secondary pattern develops.
NOTE: In order to see the secondary pattern, it is important that you completely fill each square by stitching all the way to the edges of the drawn lines.
Doesn’t this look like fun–especially now that you can see how easy it is?
Try this in large squares, too. It looks very modern in a six inch or larger size. In the smaller scale, it looks like a snowflake. Wouldn’t it look great on a Christmas quilt–white stitching on red background???
On Open Line Friday this week we’ll be discussing marking and marking tools--bring your questions–and your favorite marking pens/pencils and tools!
Tomorrow–I have a Halloween project to share on Work in Progress Wednesday!
35 comments
my studioQ
Thank you for sharing all your fabulous patterns with us! This is perfect for a quilt I’m working on now!!
Hazel
Just learning FM ,your blog is so inspiring ,
Debra Mack
This will be perfect for the western fabric donation quilt to fill the four patches. I am undecided about the larger squares? Maybe wagon wheels. The fabric has stagecoaches, horses, wheels, cactus. Whatever is quilted in this area probably won’t be seen to well, so should be simple. The outer border reads a solid so maybe a jagged square shape on point, a southwestern design? Cactus, coyotes? The outer border is 4 inches.Always on the outer border I try to remember to write LOVE in cursive.
A little accident yesterday, I have been using donated batting from other quilters and some pieces require piecing. I always overlap the edges of the batting and cut a nice neat cut with a rotry cutter so the edge bunt nicely. We instead of sliding the cutting mat along it kept snagging so I moved to the other edge and didn’t get it between the backing and batting. Yes made a nice clean cut for 18 inches. So I folded the backing in half to put a narrow seam..It was a hard lesson learned which I try to prevent. In the future I will layer the top and batting first, then trim and piece, then layer the backing..
Sew Peacefully Thank you. DEB aka FLO
Sarah Scott
I just started reading your blog and love it so much!! So many awesome FMQ designs!! I am just starting FMQ and love to see what you come up with!! I look forward to seeing every new post and look daily to see if you posted something new!! Thanks for all the awesome inspiring ideas!! 🙂
Linda Swanekamp
Your link worked and uploaded two photos, used the Squiggle Square on the borders. Thanks!
Rebecca Grace
OOOH, how timely! I was hoping I’d find a good border design and you never disappoint. Back to the machine I go!
Pat Noonan
Your blog is so inspiring. I also found it about a week ago and I’m so glad. Love the squiggle squares.
Lori Kennedy
Hi Pat, So glad you found us! I hope you will give all the tutorials a try–and send photos!
Linda Swanekamp
I just tried the squiggle square on a border of a comfort quilt I am finishing. It is very imperfect, but am posting it on my blog right now, artinsearch.blogspot.com
How do we post on your flickr page?
Lori Kennedy
Search the groups for The Inbox Jaunt Quilting Guild. Can’t wait to see it!
Linda Swanekamp
Lori, I copied your words exactly and put them into the Flickr search box, and can get no results. Could you post the link? For example, my Flickr page is Flickr.com/photos/artswansatcamp, so if you could post the link, I could get there. Thank you.
Lori Kennedy
Hi Linda, Thanks for being so patient. Here is the link (I hope) http://www.flickr.com/search/groups/?w=all&q=The+Inbox+Jaunt+Quilting+Guild
I will keep checking today to see that it worked. If you don’t mind–I’ll use you as one of my “guinea pigs”. If you are able to post, then I will post about it for others. Thanks again!
Lynn Mc
What a great design this is. It looks easy enough for me- a new FMQ’er – to do with just a quick practice. I love your tutorials. Thanks so much for doing them.
Lori Kennedy
Hi Lynn, So glad you are enjoying the tutorials. Practice on paper first, then get to it!
LauraBC
Oh that is perfect for a project I am just finishing off. I did an art quilt of my grandson and I messed up the background, so I just ripped out all the background stitching, and will use this instead. I’ll post a pic once I get it done. It’s exactly what I was looking for.
Lori Kennedy
Laura, Can’t wait to see your grandson’s quilt!
ipatchandquilt
Love love love it! It is so beautiful this FMQ pattern! Thank you for this inspiration!!!
Esther
Lori Kennedy
Esther, Glad you love it–and thanks for chiming in today!
Kitty
Love the Squiggle Square! I found your blog a week ago and I’m so glad I did: your tutorials are great!!
Lori Kennedy
Hi Kitty, So glad you found us. Spread the word–we’re trying to build a community of fearless FMQers!
Lorie bugaiski
Cool! I will give it a try tonight. I have a question on the stitches. Is the tension wrong on it! And which tension do you adjust to fix it! When I fmq it looks like that on the bottom!
Lori Kennedy
Lorie, Are you asking if the tension is wrong on my sample photos? I think the tension looks pretty good in the Squiggle Square photos. I always adjust my top tension when free motion quilting. On my Berninas, I lower the top thread tension–a lot! If you would like to send me a photo-I will try to help you adjust your tension. What is the easiest way for you to take a photo of your quilt? Cell phone? Camera?
Katell, Quilteuse Forever
It is such a lovely quilting idea again Lory, thanks!
Lori Kennedy
So glad you like it! It’s so easy and yet can look so complicated.!
Linda
These tutorials are great. I know that I can go back and look at them and your teaching style really makes me feel like I “CAN” do this.
Lori Kennedy
I am so glad the tutorials have given you confidence. We are all Fearless FMQers!
Pat (Sparky's Mom)
Very cool! I’ll have to try that one.
Raewyn
Another great design, thank you!!
Lori Kennedy
Raewyn, How did your birdhouse class turn out?
billiemick
I just found your blog about a month ago. I really like your way of teaching the FMQ. Do you have a book out?
Lori Kennedy
I am so glad you found us! I am currently exploring a few options for publishing the quilt motif tutorials. Another work in progress about which I am very excited! Stay tuned!!
Julie S.
Very cool!
Comments are closed.