

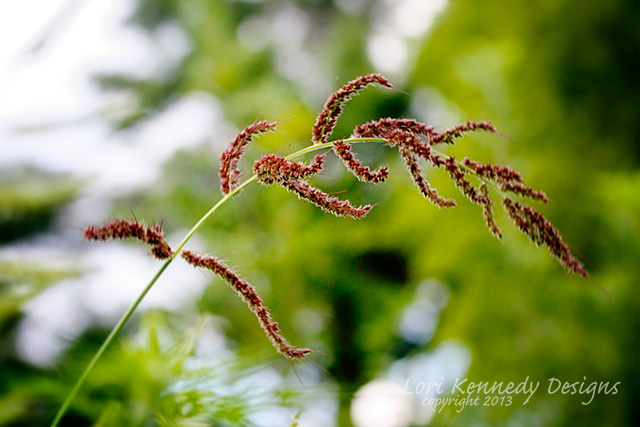
Today’s Tuesday Tutorial is inspired by the many beautiful fall grasses that grow in the gardens across Minnesota. Karl Foerster is one of my favorites…
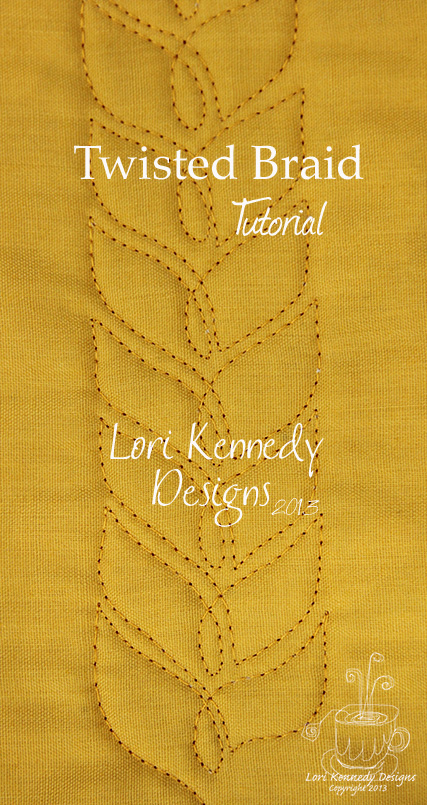
Braided Wheat would look great on any fall-inspired quilt and though it looks complicated, it’s easy once it is broken down into steps. After a few practice doodles, you will get into a little see-saw rhythm and be able to stitch this very quickly.
Begin by drawing three evenly spaced lines or “rails”. In the sample below, the lines are 3/4 inch apart.
Begin stitching on the center rail. Stitch up a few stitches, curve toward the left rail, stitch along the rail several stitches, then stop.

Reverse directions and stitch down toward the center rail. Stitch a loop on the center rail. (I’m a little off in the photo below–oops!)
 Now stitch up to the right rail and stop.
 Stitch down toward the loop and stop in the middle of your loop.

Next, echo-quilt next to your first loop toward the left rail. Now you are ready to begin again.

This pattern looks complicated, but with a little practice, it is easy to stitch. It is my new favorite border and I hope it will find a home on your next quilt.

Tomorrow is Work In Progress Wednesday-–please stop by to see Braided Wheat on a small piece I am quilting...
Until then, Keep Doodling!
Lori
PS…Please Pin and Re-Blog with attribution to The Inbox Jaunt. All photos and tutorials are copyrighted by Lori Kennedy Designs and are intended for personal use only. Please contact me for any commercial use of images or tutorials. Thank you!
36 comments
Laurie Gelo
I love your quilting. And your tutorials that are complete with all the step outs make it so easy to replicate.
I was wondering what you use to mark your quilts with and how do you erase those marks?
Lisa lawson
These are beautiful! Thank you for taking the time to generously share your artistry with us lowly folk! Wonderful!
buzzyblogMaggie Buzzell
Just discovered you and just love your tutorials. Thank you for sharing.
Melissa Milos
really you are so inspiring to me. I love how even and elegant your work is.
Katell, Quilteuse Forever
Everything looks easy with your wonderful tutos Lori!
I may use this braid quite soon and I will let you know if I am successsful!
Thanks from France,
Katell
Connie
Beautiful design, thanks!
Laura
I so look forward to your blog everyday and especially the Tuesday tutorials. I love to doodle your designs every evening. I have my muslin sandwiches ready to practice this new design tomorrow morning. I’ve decided the reason I like your designs so much is because they flow, have a nice rhythm whether doodling or quilting.
Katie
Brilliant design! I love it!
Roxanna
Hi, Lori One of my favorite authors, Marie Bostwick, mentioned your website in her email I received today! Girl, you’ve gotta make some money using your skills!! Perhaps Craftsy should feature you too!! Best wishes to you. Oh, I love this tutorial too.
WordPress.com Support
Thanks for letting me know how so many new people joined us today–I was wondering…
I’m exploring ways to pay some bills…and I would love to hear some recommendations.
Thank you for your encouragement. Please enjoy the tutorials!
Queenie
Boy-oh-boy do I love this braided wheat!
Have a great day.
Always, Queenie
WordPress.com Support
Thanks, Queenie.–It’s fun to stitch, too!
Alberta
Love it! Your timing is perfect
Great tutorial.
WordPress.com Support
You must be working on a fall quilt?
Chris
My poor brain can’t cope with this one just can’t get it practise practise. Thank you lori another lovely design xxx
WordPress.com Support
Try a different motif for awhile and let you subconscious work on it. Try it again in a week and I bet it will seem easier.
Chris
Thank you for that, felt so thick your help is gratefully received xx
carmen
Really pretty!
Dortha Agnew
You always make it look so easy as well as beautiful and doable even for a novice like me! Thank you for sharing your expertise with us, Dortha
Lori Kennedy
You are so welcome! It is all do-able! One step at a time —just follow the photos on paper first and then you’ll create the muscle memory to help you when you stitch the motif.
Joy French
I love all of your designs but especially this one. I also would love to see how you would turn the corner of a border. Thank you so much for your blog. It is award winning!
Lori Kennedy
Hi Joy,
I haven’t figured out a good way to turn the corner yet–it will require a bit more doodling. Tomorrow I will feature the border in a small quilt, with a square in the corner. It is a good way to finish a corner when you’re not sure how to make the turn.
Amie Tarpley
I love this for borders! Kinda feather-like but easier and more interesting. Can you tell us how do the corners if it was used in the border? Thank you, Amie
Lori Kennedy
Hi Amie, I’m so glad you like The Braided Wheat. I haven’t quite worked out the corner treatment. For now, I just used a different pattern in the corner–this is a great way to make your quilt look neat when the corner challenge has not been worked out…
Elizabeth S
Thank YOU!
Lori Kennedy
YOU are welcome!
françoise 38
This design is marvellous ! I like it, really ! And your explanations are excellent for me !! With them, I hope be successful at doing it myself.
Do you understand what I want to say ??? hum! hum ! hum!
thank you very much.
françoise
Lori Kennedy
Thank you, Francoise,
I do understand–and I appreciate the sentiment. I’m so glad that we have so many quilting friends from France!
Doniene Fullagar
Lori, I’ve been following your blog for a few weeks, and I love seeing your tutorials on
Tuesday morning. I’ve already incorporated many of your designs into my quilting repertoire! Thank you for your inspiration!
Blessings
Lori Kennedy
I’m so glad you’ve been able to stitch the patterns already. I notice we are both dog lovers–sorry to hear about the loss of your gorgeous Border Collie!
Patti Kaplan
Lori, you are amazing. This design is beautiful and you did an excellent job explaining.
I so look forward to seeing your email on Tuesday mornings. Thank you for the continued inspiration.
Patti
Lori Kennedy
I look forward to seeing YOU in October! Can’t wait to catch up.
Barb Schellinger
So lovely! I can’t wait to be able to get to my sewing machine! Excellent visuals as always Lori.
Lori Kennedy
Thanks, Barb. I hope you get a little time away from your studies to stitch. All work and no play…
Comments are closed.