


DID YOU READ THE STORIES?
Good morning, Quilters!
FIRST…I would like to thank all of you who answered Friday’s question, Who taught YOU to sew? Thoroughly enjoyable reading! I loved that so many of you remembered your Home Ec teacher’s name. We will re-visit this topic later this month…You’ve given me a few ideas I would like to share.
POSIES ARE FOR-GIVING
The weather is gorgeous here in Minnesota right now…we’re in between a few thunderstorms…but the garden is thriving and that influences my quilting…
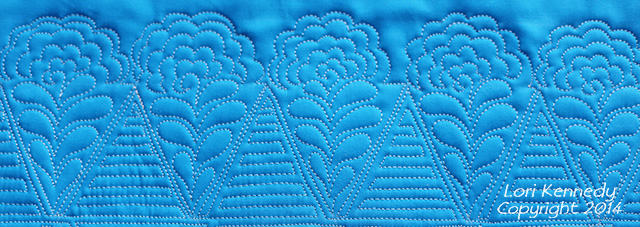
I love flowers!
Today, I have a little bouquet for YOU….and if you lean in really close to your screen you can even smell the lovely, sweet scent of peonies!
Just testing…
So, here’s where we’re going…
There are a lot of pictures and several steps, but this is an easy–and forgiving pattern. No need for perfection! (Just like in my garden–not perfect, but still pretty!)
 THE PRETTY POSY TUTORIAL
This pattern requires a little marking. Begin by drawing two lines 3 inches apart and another line 1-1/2 inches above the top line.

On the middle line, draw “tick” mark every three inches.
On the bottom line, measure in 1-1/2 inches and then draw a tick mark every three inches.
Use a small ruler to connect the tick marks…and create triangles across the length of the fabric.
(NOTE-Check your ruler box, you may have a ruler that does this quicker…)


Now you are ready to stitch…
 Begin stitching on the middle line…Stitch down the line—Stop before you reach the point–and being stitching rounded leaves, alternating from right to left.
 Once you fill in the triangle, stop in the middle…
 And add a curl.
 Scallop around the curl from left to right to create the first row of flower petals:
 Stitch another row of petals from right to left and continue…
 Stitch five rows of petals and finish on the right side of the motif. Stitch across on the middle line to the next “tick” mark and stop.
NOTE–The last row of petals extended above my drawn line or “rail”….This is fine as long as the rest of the motifs remain consistent.)

Stitch a straight line down to finish the right side of the posy’s triangle, (NOTE–Stop the stitches just before the bottom line) Then echo stitch back to the top….
You are now ready to begin the second posy.
 Lovely!–Ready for the second “pass”.
 The second pass fills in the empty triangles. Be creative here…Fill this triangle in with anything you like…
To fill in the posies as above…
Begin stitching ON the bottom rail. Stitch straight across the rail and stop before the edge. Stitch a slightly backward angled line, then stitch from right to left. Continue back and forth until the triangles is almost filled.
 From the left side of the triangle, stitch a tiny top triangle and continue down the right side of the triangle…
Stitch all the way to the bottom “rail” and begin filling in the next triangle.
 Just remember that the left and right sides of the Posy Border have only half triangles to fill.
 A Single Row of posies is really all you need!
But, you know me…I can never stop with one flat of petunias at the flower market…
nor with one row of posies!
 Ring around the Rosie,
Pockets full of posies…the rest is kind of grim….
Lori
PS. All images, tutorials and information are the property of Lori Kennedy at The Inbox Jaunt and are intended for personal use only. Feel free to blog, Pin, Tweet, Sing about with attribution to The Inbox Jaunt. For all other purposes, please contact me at lckennedy@hotmail.com.
31 comments
Kathi Alderink
love it, thanks for sharing your tutorial
rascassepoule
I love it, thanks for this georgous tutorial, Lori
Margie
Lori I love your patterns and your tutorials. I hope to try them as practice pieces soon. Thank you for posting them each week
Mandy
Wow, you make it look so simple! I’ve only found you after seeing one of your pins on Pinterest. Today I pulled my Bernina out from the attic (dusty and all from all the renos in the last year and a half) I only hope I remember how to run her to try your ideas when I finally get my studio up and running.
Bonnie. Reed
this is beautiful. Was just looking for a new pattern for a wide border on the quilt I am doing. This is perfect! I love your tutorials!
Bonnie
Yasmin
Very cute. You do not cease to amaze your creativity to the designs. lGracias.
Debbie
You make it look so eady
Pat
Congratulations on the book!
Can it be published in a format that will lie flat at my sewing machine–spiral bound, perhaps? I don’t know what that does to the cost of publishing, of course, but just a thought. I am looking forward to this as I, too, need the tutorial at my side when I try the designs. Thank you for this beautiful design.
WordPress.com Support
Great minds think alike–I am requesting a spiral from the publisher–but ultimately it is their decision.
Queenie
This is a beautiful quilting design, love it!
Have a great day.
Always, Queenie
Ness
Super cute! Love this one too! Beautiful work Lori!
Tatiana
Very nice! Thank you
Jan
Wow! You make me think I can do this! Now I want to try it.
Karen
Your tutorials are the absolute best! They are so easy to understand and make so much sense to me. You break things down into do-able steps. I look at your tutorials and say to myself, “Yes! I can do this!” I can hardly wait for your book to come out. By the way, what pen are you using to mark the fabric?
Barb E., Highlands Ranch, CO
Wow! It looks so complicated but you break it down and make it look actually do-able!! Thank you so much. You really are a great teacher!!!!!
Katherine Smith
Lori, I enjoy your site so much. I am new to FMQ , and enjoy the photos you take for explaining your designs. It seems easier to figure out the directions to go to make the design.
BARBARA
Oh Lori, my very favorite flower. Most of ours have already bloomed making it time for the Zinnias. We have so many butterflies & hummingbirds that our Natl. Geographic photo journalist neighbor always rises very early to capture their waking for breakfast.
Thank you for sharing your talent & motivation.
Judy
Great tutorial! It looks like one I could actually do, too.
rosemarazzle
Rosemary B here:
This is beautiful Lori. I love how it looks on the blue. What a sweet pattern.
I agree as well, perfection is over rated and really, no one should be looking so carefully for flaws and defects
Have a lovely Tuesday. It is going to be VERY hot here in Northern Virginia.
Pat Minich
I just love your tutorials. Is there a way to print them so I can take them to my sewing machine? Do you publish them by any chance? Thanks so much for your inspiration!
Lori Kennedy
I am so glad you like the tutorials. I an in the process of writing a book.
Pat Minich
Wonderful!
lilquilter
Thank you, Lori! I aspire to such creativity…if only I would start PRACTICING.
😉
I would love to see videos of your tutorials. It would help me to be able to see stitching in action, to see when and how you stop and start. Meanwhile, I look forward to each week’s tutorial and other postings. Keep ’em coming! Thanks again!
Mary Grass
So very clever, Lori…….I love it! Thank you for the great inspiration.
Barbara Allen
These posies also make me think of cupcakes or ice cream cones – a gardener with a sweet tooth, clearly. Love all of your tutorials!
Donna
Wow Lori you make it look so easy. I’m going to give this a go.
amq97
This is gorgeous and will fill a large border so nicely!! Thank you Lori!!
Allison in Plano, TX
Pat in Oregon
I love these tutorials. This design looks like such fun, and doable too!
Kerri Robinson
This is so pretty! Thank you again for sharing your talent, you are so generous!
Comments are closed.