

 Good Morning, Quilters!
It’s the fourth day of Spring, and snow is blanketing the gardens of Minnesota–dashing any thoughts of purple or pink hyacinths outside…
So, a Spring Quilt will have to do for present….
Today, a tutorial
Tomorrow, a vase quilt to share…
THE HYACINTH FREE MOTION QUILT TUTORIAL

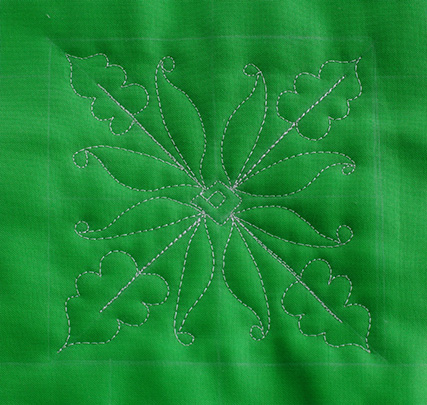
This motif is a great border pattern and it can be easily altered to fill a square.
When first learning this motif, it may be helpful to draw a few lines to help establish the proportions.
Begin by drawing a rectangle, 2 inches tall by 1-1/2 inches wide.
Begin stitching in the middle of the bottom line. Stitch a straight line, 3/4 of the distance to the top line. Retrace the stitches back to the middle of the rectangle.

Stitch three scallops on the right side, tapering to a point at the middle.

Taper down to the left side, mirroring the scallops.
 Stitch down the stem line, stopping a few stitches above the bottom line. Begin the left leaf by stitching an angled line to the left border then stitch a small circle.

To complete the leaf, stitch a wavy line tapering away from the circle and again tapering at the stem.

Stitch the right leaf in the same way. Stitch on the baseline to begin the next Hyacinth.
A row of Hyacinths would make a beautiful border on any quilt or table runner.
When stitching the Hyacinth larger, add echo stitching for more fullness.
 To fill a square, arrange the Hyacinths on a diagonal.
JOIN ME ON INSTAGRAM
@theinboxjaunt
#MeanderNoMore
#Flowersinwinter…
#Spring
THE WEBINAR–THANK YOU FOR YOUR PATIENCE
If you signed up for last week’s Webinar and did not make the live event….the link will be sent to you shortly–thank you for your patience. (If you did watch the Live event, you will also receive the link to watch as many times as you like…)
You can still sign up and receive the link in the next few days HERE:
Meander No More: Learn to Free Motion Quilt With Confidence
THERE’S A LOT MORE QUILTING THIS WEEK!
Lori
PS…This tutorial was stitched on my BERNINA 820 (No BSR) with Sulky 40 wt Rayon on top and Aurifil cotton 50 wt in the bobbin. Kona cotton and Warm and Natural cotton batting…
PPS…All tutorials, images and information are the property of Lori Kennedy at The Inbox Jaunt and are intended for personal use only. Feel free to re-blog, pin and share with attribution to The Inbox Jaunt. For all other purposes, please contact me at lckennedy@hotmail.com. Thanks!
34 comments
Patsy Kaufman
Thank you for creating and sharing the hyacinth motif with us. You make it look so easy!
Peggy
I have used several of your motifs on my quilts. Your tutorials are a great help as I am new to FMQ..
Marta. south Georgia
The hyacinths are precious! thanks..I will make them. Our neighborhood quilt group is going to make a swap block of flower baskets for Easter 2016. Are there any daffodils? Mine just finished blooming and it is cold again…drizzly for almost a week. UH,..a question Lori. I am thinking of a frontal, face FMquilting design of my beagle..something very simple but unmistakeably her. Have you ever tried anything like that? I still don’t know how to make my own designs that will start me in right place and not sew myself into a corner and cause excess thread lines that ruin any simplicity. Do you think if I enlarge and copy a photo and doodle it, I could get a design but where to begin the sewing?
Lori Kennedy
I love beagles! Didn’t a beagle win “Best of Show” this year?
Your idea sounds promising. Let me know how it works.
No daffodil tutorials yet!
twemyss
wonderful to try out, will do that this coming weekend when I am alone and can cuss in peace, hahaha!
Lori Kennedy
No cussing allowed!
Tina
Thats for sure, I keep saying dang and the grandchildren come and tell me no grandma, hahahahaha
nancy
I love all the motifs to add to my quilts. I like to make designs the pick up patterns in the quilt. Your motifs are very creative.
tcharp
You are wonderful to share this! So creative! Thanks!
Jan
Priscilla Golz
The hyacinth motif is beautiful! Fantastic spring fragrance coming soon!
Marianne
This is a wonderful tutorial. Thank you so much! It puts Spring in our hearts, in spite of what’s going on outside!
duff
gorgeous…as usual. :O)
the four square flipped my thinking from “spring” to “year-round”–way to go!
Terry Sheldon
Love the Hyacinth!
Terry Sheldon
Loved your tutorial, made some notes! One thing you mentioned…I finally found something that helps me quilt…you say you don’t like gloves, but I LOVE Machingers. The only thing wrong was I had to take them off to do anything else. I’ve recently taken a couple of classes on Craftsy from Christina Carmeli, who cuts the thumb and first two fingers off (as you mentioned) her Fons & Porter gloves, and recommends it. I hesitated and was afraid to mess up my Machingers, so bought some F&P gloves and did like Christina. One of the best things I’ve ever learned since I started quilting! You don’t really have to take off the gloves for anything else, and then I also cut my Machingers!..just sayin’…
Lori Kennedy
I do think that would make a difference for many people. Thanks for sharing that tip!
Kristin
The hyacinth is lovely! Thank you! So sorry you have snow….here in NW WA state we have rain, but lots of daffodils and hyacinths. The deer don’t eat those…..happy spring?!?!
Laura Cammack
I paid for the online class you held a week or so ago and could not attend. You said there was a link you would be sending out for those that couldn’t make the live event. Have you sent it out yet? I really hope I didn’t miss it!! Thanks!!
Lori Kennedy
The link should go out today or tomorrow. Let me know!
Laura Cammack
Yes it did, thank you very much. I am really looking forward to watching it!!
Phyllis O'Connor
Thank you so much!
Kaylene N.
I have been sick the past week and now I am ready to get in the sewing room. I am going to try this hyacinths pattern the very first thing!
Lori Kennedy
Hope you are feeling better and that the Hyacinths cheer you up!
Susie
THANK YOU so much for this awesome tutorial! I am new to fmq and just ripped out my feeble attempts at fmq on my quilt. It is too big for me learn on. I can actually understand every step of your hyacinth tutorial , and am going to practice making this flower in small areas!
Lori Kennedy
Start small and learn the mechanics of quilting before you do “The big one”!
Phyllis
My hyacinths have bloomed in lavenders but had to be staked and supported since they are top heavy but the fragrance is wonderful! Will need to learn how to quilt it to add to my quilts.
Ann
You are so clever. I enjoy seeing how you’re going to express your creativity next. Thanks for sharing your talent and expertise with us.
deloristhomas
This is amazing! This makes me want to do more with my free-motion quilting.
deeannie
AMAZING!
Nancy
Love it! I love hyacinths and I’m going to try this one today. It looks like a whole lot of fun. Thank you Lori!
Ness
I love hyacinths! So darling thanks! I can almost smell their fragrance! Hurry warm weather! We woke up to snow today too! Blah!
Jo S
Thank you for all the tutorials. They have given me the courage to do more than just meandering.
Comments are closed.