

 Good Morning, Quilters!
What a difference a week makes! Last weekend, we endured a blizzard that dropped 16 inches of snow and yesterday it was 70 and sunny!
The birds are chirping–heck, I’m chirping!! Woo hoo! Tweet-tweet!
Let’s quilt a Silly Bird to celebrate Spring!
DOODLE FIRST
Follow along with a pen and notebook. Doodle each step shown here, then add your own variations to create YOUR Silly Bird.
THE SILLY BIRD MACHINE QUILTING TUTORIAL
Start by stitching the foot, and then add a straight line leg.

Add a large oval.

Stitch three semi-circles.

Add a triangle-ish shape to create the tail feathers.

Closely echo stitch to the top of the oval. Use slow stitching technique to create a curved line with small eyelashes. For a simpler eye, add a spiral.

Add a few head feathers for embellishment.

Closely echo stitch the from of the oval then add a small triangle beak.

Add decorative elements to the body.

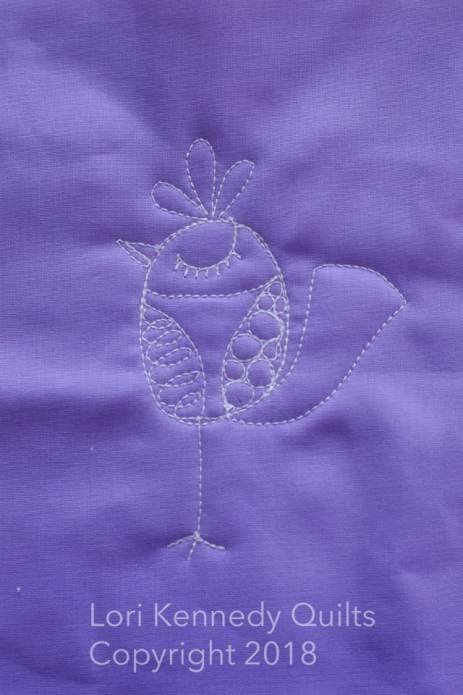 Embellish the tail and then complete the bird by adding another leg.
How silly is that?
This is a great bird formula (I was going to say “recipe“–but that seemed disrespectful?!)
Use it to create variations by changing the length of the legs, the shape of the body and the embellishments to create YOUR own Silly Bird!
Tweet-tweet!
Be sure to check out Jennifer Thomas of Curlicue Creations on the Spring Clean Blog Hop today!
Signed,
Skylark Lori (or perhaps, more fitting-Lori the Loon!?)
PS…All tutorials, images and information are the property of Lori Kennedy at The Inbox Jaunt and are intended for personal use only. Feel free to re-blog, pin or share with attribution to The Inbox Jaunt. For all other purposes, please contact me at lckennedy@hotmail.com. Thanks!


19 comments
HollyAnnW
It’s been a long, cold spring here, too. Rain followed by snow a few nights ago. But being in a drought here in NW SD, any moisture we get this time of year is welcome. A banner of birds at the top of your blog page would surely be a most welcome harbinger of spring.
Gypsybaker
I love your sense of humor…and, after all, the loon is the MN state bird. Although
when I lived in MN, we called the mosquito the state bird. Your blog is so logically
written, it makes me believe I can do this!
Linda St Andre
Thank you Lori! Your clear, step-by-step directions make this so simple to do. I am only doodling at this point. I am between my winter abode and my home base. The sewing machine is packed up till fall, but i will take this birdee back home with me and stitch her out on my Bernina when i get there! I will also be receiving my copies of your two books when I collect my held mail. Looking forward to that for sure!
Janet Licari
Your bird is so adorable! I also had to laugh at your comments…Lori the Loon? I like Skylark and formula is better 😉 Thanks for the inspiration and hope your snow is melting!
Teri Coha
Can’t wait to try making some birds. I as a picture of birds doing yoga that I might try to quilt.
Jennifer Thomas
Thank you for the mention! Love your Silly Bird tutorial ~ it’s adorable. Have a fabulous day!
Joy Loesch
I love your silly bird design. It looks like one could have a lot of fun with that!
backporchstitcher
I love your birds the best! Especially cute, silly ones like this little guy. Thanks, Lori.
Becky Shaffer
What a cute silly bird. I love how you break down all of the steps for us. I can’t wait to use it. We had a lovely weekend, now rain. Ugh! Our trees are just starting to bloom. I hope the rain doesn’t knock all of the blossoms off.
Dottie K
Silly bird is adorable! Just love it. TIA
Pat Knight
love this loony Bird. plan to use it on a baby quilt. thanks
Marta
A real cutie pie !
Patty Adams
As much as I love your tutorials and the oftentimes whimsical objects, I love your keen sense of humor more! Your signature today “or perhaps, more fitting-Lori the Loon” made me laugh out loud. I always check out your subject-appropriate signature line. Thanks for the humor along with the wonderful stitching!
WordPress.com Support
Thank you! When I hit the “publish” button—all I hear is silence. Never sure how ones sense of humor translates in writing!
L84quilting
Tweedly dee Lori, That studio tour, yesterday, was awesome and sorry I didn’t put my comment to it then, as I was so busy, that I didn’t even get to check a single email! As for your weather, I just hope you don’t get the 6″ os snow we got here in Montana, yesterday, as our weather usually heads east to you…! LOL! (We had that 70+ degree weather on Sunday!)… As for your bird, SUPER, DUPER ADORABLE! I too am always amazed at how your creative mind ALWAYS can come up with such awesome designs! I love, love your books and as I have said to you in the past, I wish you would design embroidery motifs! THANK YOU so much for such awesomeness! T
Lorraine Doyno Evans
Cute!
Pam Peterson
I’m ever amazed at what you can do with thread. An adorable bird to welcome spring, for sure!! Thanks again for sharing your creative talents.
Cheri
Love your birds, baby bird, too. I can almost hear them chirping!
Comments are closed.