


It’s a chilly morning in Minnesota, but what do I care? I don’t have to go anywhere this morning and we all know I have plenty of quilts to keep me warm! I am going to quilt all day (I wish!)

Today we are stitching a little Free Motion Party. Swirls and Twirls looks like a “party-on-a-quilt” to me! This pattern dances across the fabric and would look great on any quilt-formal or casual-waltz or zumba!
The Swirls and Twirls Tutorial
This is a 3-Pass pattern. That means it will require three rows of stitching to complete the motif.
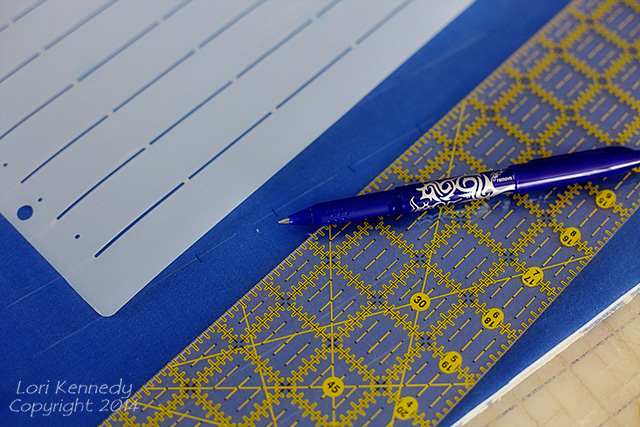
First, a little marking. For each row of Swirls and Twirls, draw two lines 1 inch apart or more. (This motif would be very difficult to stitch any smaller than one inch.) On the bottom line, draw “ticks” 1-1/2 inches apart. This will help you keep the spacing between the spirals even. With practice, you may not need the tick marks.
(NOTE-Don’t forget… Frixion pen markings don’t come out with ironing–you must use steam to remove these lines-Thanks, Marianne for the reminder!)
Stitch a row of spirals, filling in the one inch rails and spacing the spirals between the tick marks. See the Spiral tutorial HERE.

Begin the second pass by echo quilting over the top of the first spiral.

Add a loop -extending above your marked one inch lines.

Add a second loop.

Add a third loop and then begin stitching toward the next spiral.

Your second pass should look like this:

The third pass is the same as the second, except underneath the spirals.
Echo stitch under the spirals, then add the loops…First one

Then two and three…

This pattern takes a bit of practice, but it is so beautiful when it’s complete…
NOTE-Don’t worry if some of your loops are different shapes and get “squished” a bit. Just avoid stitching over any other lines or double stitching in any area.

This tutorial was stitched with Aurifil in the bobbin and Robison-Anton Rayon thread on top using a Schmetz Topstitch size 80 needle on my Bernina 82o.

Tomorrow is Work in Progress Wednesday and I have a little vase quilt with swirls and twirls and spirals and more to share…
Hope you have made some progress on your Quilt Notebooks…How many UFOs have you found? (Read HERE about this week’s Notebook Assignment) One reader described her search as an archaeological dig!
Warm wishes and Happy Stitching from Minnesota,
Lori
PS…All tutorials, information and images are property of Lori Kennedy @ The Inbox Jaunt and are intended for personal use only. Feel free to Pin and Re-blog. Please contact me at lckennedy@hotmail.com for any other use. Thanks!
55 comments
tea
Hi Lori,
I love your scrolls and swirls tutorial. When I FMQ, I like adding scrolls and feathers. This reminds me of that. I’m stil not allowed to sew yet. But I practice your tutorials in my journal. I can’t wait to get back quilting again. My machine is lonely. So sometimes I sit in my studio to keep it company…lol. Thanks for sharing your talents.
Linda
Thank you for the tutorial. I am assuming this is done on a sewing maching. I am ready to try this out.
JillB
What perfect timing! I’m just ready to quilt the border on my first “modern” non-bed-sized quilt with “swirls and twirls” appliqués on it, so this motif is absolutely perfect for the border! I only recently found your blog, and have really been enjoying your ideas, all the more so as I live in France and don’t have many opportunities for classes in FMQ. Thanks for your generosity!
Lori Kennedy
Jill, So glad you’ve joined us from France! Please send us a photo of your swirls and twirls quilt once it’s quilted…either on Flickr or e-mail a photo to me!
JillB
I will, Lori!
Shelor Robin
Found your blog recently and anxiously await all of the tips and tricks that you have shown. I am determined to learn to fmq in 2014 and all of your wonderful deigns will be so helpful! Thank you for sharing.
Lori Kennedy
Love your spirit! 2014 is going to be a very creative year here at The Inbox Jaunt, too!
Chris Teague
Thank you so much for showing us how you make such beautiful scroll-work. I look forward to seeing what you do!
Marianne
I am on fire for this tutorial! Thank you so much. It’s so graceful. I want to make a quilt to use it on.
Lori Kennedy
Marianne, Get to it! Love your “on fire” spirit!
Ellen Jordan
Dear Lori,
I love your blog. Thanks so much for your willingness to share your talent with us. Your designs are amazing. They look so intricate but your directions make them seem simple. I’m just learning to quilt on my new Bernina 750 and am anxious to try your patterns.
Ellen Jordan
Marta
I am new here and loving it ! I recently attended a workshop held for our guild on how to free motion on a small sewing machine. I learned a lot as I am new to quilting although I have been sewing since age 10. I have a question…what stitch length are your projects which are shown here? Are they longer in order to show up on the photos? We were told to use a 1.7 or 1.5 stitch length and I don’t like how it looks or feels. Have there been discussions on this that I missed? Thank you… ( used to camp the St Croix when we were newly weds 48 years ago..LOL)
Lori Kennedy
Hi Marta,
So exciting to hear from you — and that you camped on the St. Croix–It’s such a beautiful valley! As for stitch length…with FMQ you do not need to set any stitch length. The feed dogs are lowered so you control the size of the stitch by the speed at which you move the fabric under then needle. You should like the look of the stitches always. It is far more important that your stitches are approximately even length than that they are small. Even is better than small in both FMQ and hand stitching. Give that a try and if you have any more questions–please get back to me!
Marta
Thanks re the stitch length info. I have 3 tops ready to go for it !!
Mona
I’m a quilter and it is so refreshing to see some new(to me) quilting ideas. Mine is all free hand and sometimes the ole brain just goes blank. Thanks so much for the fun and creative ideas.
Lori Kennedy
Mona, I’m glad you are enjoying the new ideas. I hope they will inspire you to try new things!
Kathyd
A lovely border treatment. Thanks so much. I am new to your site and really enjoying all your designs.
Lori Kennedy
So glad you’re here!
Brooke Witsberger
Love this tutorial, and truly appreciate all you post! Where did you get the stencil, or did you make it?
Lori Kennedy
Funny you should ask…It’s from the Stencil company and we’re doing a giveaway later this week!
Jae
Your blog is just what I was hoping to find for beautiful, artistic and inspiring FMQ designs. Thank you for so graciously and freely sharing your ideas w us 🙂
Dale Thornton
I enjoy reading your tutorials, if only I could print out some of your instructions.
I am reading your pages on a tablet but do not have a wireless printer
Dale
Lori Kennedy
I’m working on a book so those of us who are computer challenged won’t need to bother!
Rebecca Grace
Ooh, I love this one, Lori! It looks like lace to me, and I agree, it could go traditional or contemporary depending on the quilt top. Very versatile!
Lori Kennedy
Fox trot or zumba!
Deb
very pretty! I’m only just learning the quilting part..you do such a nice job!…..time for me to run to my sewing machine (thinking) I think i can I think I can,,LOL
Lori Kennedy
Of course you can, of course you can!
Lucie the Happy Quilter
Looks fantastic Lori.
Kat
Do you mean only unfinished quilt projects? I usually have about 30 or so. If I add all the other stuff I haven’t finished, it must be 100. But I will count quilts this week, and post to my blog. This is a good exercise.
Katcampau.com/blog
Lori Kennedy
Maybe you should stick with the quilt projects! LOL! At least you have gorgeous notebooks to use!
Ness
This is sooo cute!! I thought it would be fun to paint this little bathroom a fun color…tropical lagoon!…sometimes I need to think before I think…so my back only lets me work above my head for about an hour a day so now that I’ve cut in the edges for my hour I better go sit in a chair…and rest my back….by the sewing machine…for several hours at least…(heh-heh!) I can’t wait to try this one …love it Lori!
Kathy
That’s really pretty when stitched out in multiple rows. What is your spacing between the rows? Looks like about 3 inches? Thanks for another great tutorial!
Lori Kennedy
Hi Kathy, The space between the rows is just one inch. That is the distance between the top of the first spiral row to the bottom of the next row. I offset the spirals on the rows so that the upward and downward loops would not run into one another. I added more photos and explanations on tomorrow’s post. That should make it more clear than words…
Joan
Thanks so much for sharing – its great!
keystonejae
very pretty! and it appears “doable”. now lets see if I can make it happen! LOL.
Lori Kennedy
Go for it! and add your pictures to Flickr!
farmquilter
How do you go around the corner with this? Have you tried that? This looks like an awesome sashing or inner border pattern.
Lori Kennedy
I just wanted to let you know that I added more photos and an explanation of how to turn a corner with this design on tomorrow’s post. (1-22-2014) Hope that you have time to check it out!
Lori Kennedy
I don’t have a picture of corners…just extend the “tail” of the spiral into the corner and proceed. Try it on paper first. If you are still stuck, I’ll do a little photo example.
andrea_r (@andrea_r)
It’s like wind and snow blowing around! 🙂
Lori Kennedy
We have been alternating between heavy snow and very, very cold all winter… Sometimes the blowing snow is great for photos!?
Cottie Dobson
I enjoy your site so much. Thank you.
Lori Kennedy
I’m so glad you enjoy The Inbox Jaunt–make sure you tell your “quilty” friends about us!
farmquilter
Thank you so much!!! This is adorable and arrived just in time!!!
Lori Kennedy
Just in time for a new quilt? Send photos!
Jeanne Crea
I wish I was a quilter! I love your tutorials and pretty designs.
Lori Kennedy
You could be a quilter, Jeanne…Admission is always open!
Sandy
I am thrilled with your web site and the up-close tutorials! Thank you!
Lori Kennedy
We aim to please! Glad you’re here, Sandy!
Roxanne
Beautiful.
Lori Kennedy
Thanks, Roxanne!
Lori M.
Lori that is so pretty,.. i will have to pratice, alot……
Roxanna
fantastic!!
Comments are closed.