


Good morning Quilters! I hope you had time to quilt over the long holiday weekend. Remember, even if you can’t get to your sewing machine, practice the patterns and motifs on paper! It is very important to doodle the designs on paper before you get to your sewing machine. Knowing the pattern helps keep your stitches even–no hesitations!
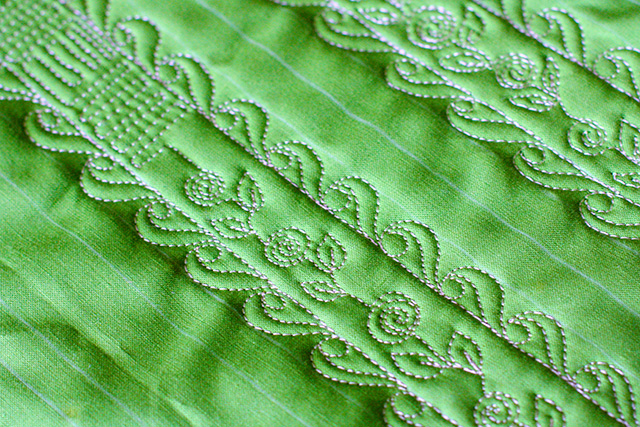
Today we are stitching the Picot Edge. We will leave a space between the right and left picot edges for you to fill in your favorite motif and make a ribbon.
This pattern is stitched in one pass for each side of the ribbon. As usual, we will begin by drawing “rails”–just to keep our stitching straight. The lines are 1/2 inch apart for the picot edging, with 1 inch in the middle for our ribbon.
We will stitch this pattern starting at the bottom and moving up…
Begin on the left line and stitch a curve…like the right side of a heart…

Stitch a complete circle and stop at your curved line…

Reverse direction and stitch back to the starting point…

When you have stitched back to the starting point, stitch up the drawn “rail” and past your first motif.

From this point, stitch the next motif…

The left side is completed the same way–in mirror image…
Start at the bottom again and work up the line…


When you have stitched both sides with the one inch space in between, it will look like this:

Now fill in the space with your choice of patterns (see the Quilts/Tutorials Tab above)…


You could also use one side of this pattern around the border of a quilt. Try filling in the space with your handwriting or a message to personalize your quilt. (Read more about that HERE.)
Later this month, we will make a sweet flower border with a variation of this pattern. Next week we will be working on Mansions—they take a long time to build, but we will embellish our starter house (see tutorial HERE) with a few windows and doors…
Please Pin and Re-blog with attribution to The Inbox Jaunt. All photos and tutorials are for private use only. For any commercial use, please contact me.
Happy Quilting and Happy Doodling!
Lori