

 Good Morning, Quilters! Welcome to another addition of Tuesday Tutorials. For more than one year–The Inbox Jaunt has been offering free-free motion quilt tutorials. You can access all the tutorials by clicking the Red Apple on my sidebar or in the “Quilts” tab above. My goal is to get everyone free motion quilting on their domestic sewing machines–it can be done!
There is one thing YOU can do for Me— TELL YOUR QUILTY FRIENDS about us! The more, the merrier.
Last week, I posted a photo of this pattern along with a Free Motion Quilting Dexterity Exercise, and several readers asked for a tutorial. So here it is: Flower Power!
FLOWER POWER TUTORIAL
This pattern is a filler or all-over pattern. Use it to fill in large spaces on your next quilt. Or use it as an all over pattern in place of meandering or stippling.

Because this is a fill pattern, there are no “rails“. Start anywhere that is convenient-the middle of the quilt or the corner of the quilt.
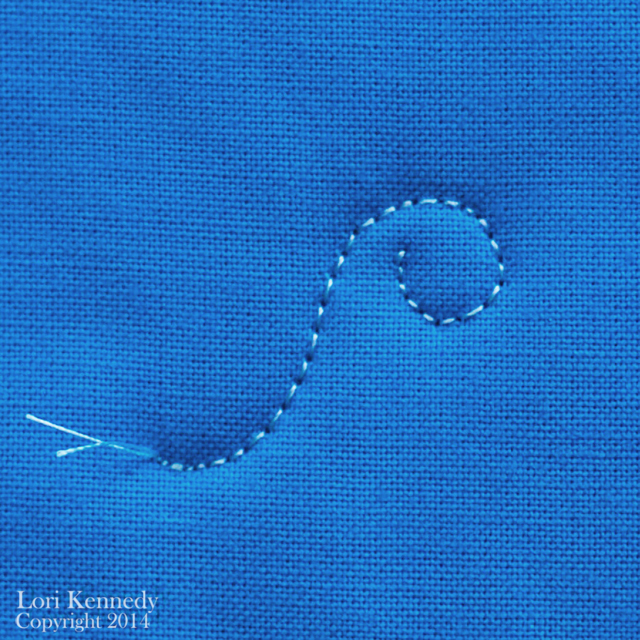
Begin by stitching a tail and a 3/4 circle.
Next, stitch petals around the circle…
 and more petals down the tail.
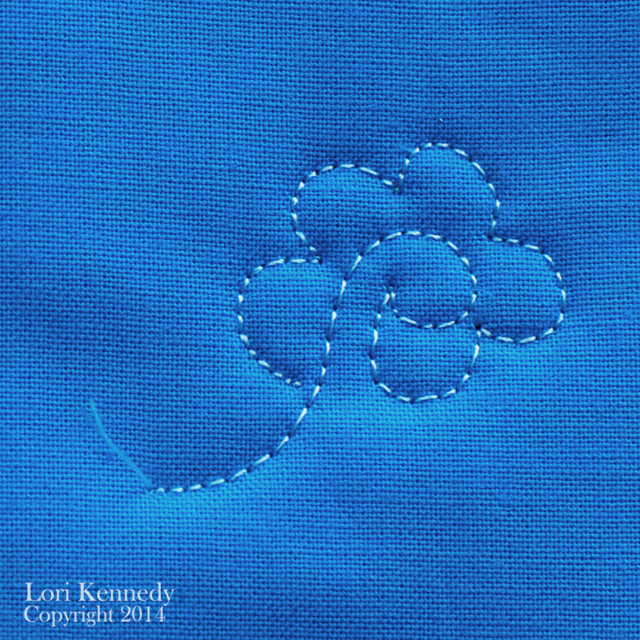
Stitch another layer of of petals around the first layer.

Continue adding more layers of petals and then start a new flower by adding a tail and semi-circle and begin the process again.

It does not matter where in the flower you veer off to add the next flower. It can be at the base of your flower–as above, or it can be in the middle of one of the layers-and will depend on where you need to travel as you are stitching. Also, it looks nice if some of the flowers have more layers than others–just like in nature!
It is easy to change the scale of this pattern. If your quilt is large and you are using this as an all-over pattern, scale up the flowers. If your quilt is smaller (like a table runner) or if you want to use the pattern to fill a small section of your quilt, you can make the flowers smaller. Determining the scale of the free motion quilting pattern is both the art and the challenge of free motion quilting.
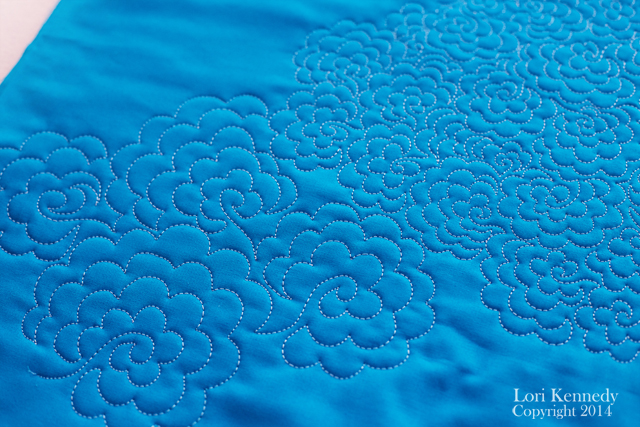
NOTE-The above quilt was stitched on Kona cotton using Aurifil 50 wt in the bobbin and Robison-Anton Rayon on top, using a Schmetz 90 Topstitch needle on my Bernina 820 (domestic sewing machine–without a BSR)—My most frequently asked questions….
When Mother Nature gives you cold, snow, white, wind…we have to make our own #flowersinwinter!
From my green thumb (on blue skies) to yours,
Lori
PS…If you like these motifs and tips, be sure to check out my book, Free Motion Machine Quilting 1-2-3 or any of my Craftsy Videos!
PPS…All tutorials, images and information are the property of Lori Kennedy at The Inbox Jaunt and are intended for personal use only. Feel free to re-blog, pin or share with attribution to The Inbox Jaunt. For all other purposes, please contact me at lckennedy@hotmail.com. Thanks!
43 comments
Cheryl S
I also love that this pattern is very forgiving. Some loops fall in the previous V while others fall into the previous loop. It looks great no matter what you do. I just love this flower!
WordPress.com Support
Exactly! Can’t go wrong!
Liz
Thank you for this site. I just got a Sweet 16 and am using a lot of your tutorials to help make my quilts look so much better. I’m looking forward to using many more.
Orimono - blog twórczy
Thank You so, so much for this! I started to draw it on a piece of paper looking at the picture pinned on Pinterest, but then I realised You’ve also put an explanation to it. It looks easier now, definitely beautiful! Thank You once again! 🙂
Verna
I just used this pattern on a baby quilt (Ladies Luncheon, also by Jenny Doan). It was very easy to do and looks great. This is my best quilt yet–thanks so much for all you do!
WordPress.com Support
Music to my ears! Glad it worked so well in your quilt!
Marsha Bohannon
This pattern is working beautifully for Jenny Doan’s “Ingrid’s Garden” with 9″ hexagons. Thanks so much for posting!
Venus de HiloStephanie
Happy dance: this looks perfect for a quilt top next up in the RFQ (ready for quilting) queue. All-over texture quilting like this is my favorite, always on the lookout for new variations. Beautiful effect, and very well explained.
Yasmin
Muchas gracias. Bello y pareciera esto fácil.
Lori Kennedy
De nada!
LJ
Thank you for this pattern. I’ve seen something similar to this before on an internet quilt and couldn’t get the lines figured out. Now that you’ve shown me this I can do some serious practicing. 🙂
Sally
Sorry, maybe I should have left you a link in case you want to check you’re happy with it, it’s here:
http://wonkypatchwork.blogspot.co.uk/2014/02/greek-quilting.html.
Hope it’s OK!
Sally
Your FMQ tutorials are always so clear, thank you. And I’ve just linked you in to a blog post I’ve written today where I’ve been using your ‘Greek Key’ design – hope that’s OK, I made sure I told everyone how wonderful your quilting is! Thanks again.
Jeannie
I enjoy very much reading your blog and learn so much from it, thanks so much of your good work. I have a question. Why did you use different threads on the bobbin and the top thread?
Lori Kennedy
HI Jeannie, Great question! I will do a more extensive post on this topic soon. You don’t need to use a different thread in your bobbin. In fact, it is often easier to get good tension if you use the exact same thread (including color) in your bobbin and on top. I use a lot of Rayon threads–Sulky and Robison Anton on top and MY machine does not seem to “like” them in the bobbin. Sometimes it’s just about finding what works for your machine-they all have their little idiosyncrasies.
Jan
I love your blog. Thank you so much for all the tutorials. My sisters think I am amazing with all the things I show them.
Leslie Schmidt
I like the idea of not quilting each flower with the same number of layers around. I agree with Linda Swanekamp that it is a classy looking design. I may try to use it on a quilt I’m making for my sister. It would coordinate with the fabric very well. Thanks.
utahoosier
I love this and have recently started following. I was also following your Monday blogs about the UFOs. I’ve encouraged a number of my friends to start following too, but now I can’t find the Monday UFO blog posts. Are you still doing those?
Julia
So amazing, Lori – I was starting the same sort of flower pattern today on a quilt and here it on your blog! Must be fate! It took me several days to decide on a pattern so I’ll take this as confirmation that I chose wisely! Happy quilting!
Lori Kennedy
Great minds think alike!
Dale Thornton
Sorry I meant could not god
Dale Thornton
That is a great tutorial, but my question is that I like a very open style of quilting
( the quilts are a lot softer with open quilting ) god this pattern be opened out, or could you do some tutorials on more open style of quilting
Thank You
Pat Rime
I had good luck using this simplified oak leaf pattern from Lori on a simple 4″ x 4″ square patch quilt. I made it even simpler, and gave myself time to think about the next square by sewing a straight line right through the next square above, and only doing leaves in every other square. In the next column of leaves, I made sure (except when I made mistakes) that I alternated so the leaves were next to a square with a straight line. I really liked the loose feel that the quilt retained.
Lori Kennedy
Hi Dale, By “open-style” of quilting, do you mean larger patterns, like the scaled up version of Flower Power?
Also, I heavily quilt almost all of my quilts and they are wonderfully soft–after a wash or two. I use wool batting for my full size quilts, and wash it in the washing machine–no special care–and they are very flexible and soft.
Let me know what you mean by open style and I will do my best…
utahoosier
also, just because Lori puts her lines 2 inches apart (or whatever) doesn’t mean we have to. As long as you use the same scale, you could put them 8 inches apart and do the same thing only bigger, which would be more “open”
Diana
I am so excited to start practicing this pattern!
Katell, Quilteuse Forever
As great as the other Tuesdays, thank you Lori!
Katell, France
Shelor Robin
Thank you again for your continued help to those of us who are “struggling” with fmq!
Marla
I shared your website with the ladies who used to attend my quilt classes and I’ve told them to sign up for your newsletter as well. I love how you break down the quilting by steps. I look forward to your e-mails and tips. Thank you.
andrea_r (@andrea_r)
This is one of my favorite patterns. Works small scale or large scale too. I’ve done huge flowers and teeny ones (not on the same quilt though).
Rhonda
Just found you through pinterest last week, I am just begining to FMQ and appreciate your tutorials!
Bonnie
Thank you, can’t wait to try it.
Carol
I love this pattern. I also love the way you explain things and show step by step how to do it. You make the most detailed patterns simple and doable. Thank you. Please keep doing what you do!
Debbie Wren
I agree with Carol…..couldn’t have said it better. Thanks.
Gerry Casper
I gave your blog address to a friend who is just starting to do free motion quilting. She is soooo excited! 🙂 I love the way you show how to do your fm patterns. Thank you so much!
Gerry
Lori Kennedy
Yeah! We love new quilters! Thanks for sharing!
Joy F
I’m going to use this free motion quilting pattern on the “Summer in the Park” that I’m making right now. Thanks for the tutorial.
Linda Swanekamp
What a great pattern! The fact that it looks good small or large is a big plus. I love these because they have a richness and simplicity. They are not cutesy. Another big plus! Thank you, Lori!
Comments are closed.