


Today’s Topic: The Square Flower Table Runner Set Up
Good Morning, Quilters!
Welcome to Week 8 of our 25 week quilt-a-long based on my new book 25 Days to Better Machine Quilting!
(Find the updated Machine Quilting Lessons HERE and Sign up for Email Lessons HERE)
Today we are going to set up the basic framework for the Square Flower Table Runner project. This fabulous little quilt uses all four of the fun motifs we started to learn yesterday and incorporates the concept of stabilizing that we will cover in depth in Lesson 19.
Layer and Mark the Quilt Sandwich
Layer a quick quilt sandwich using a fat quarter top and backing. (Approximately 18 x 22″)
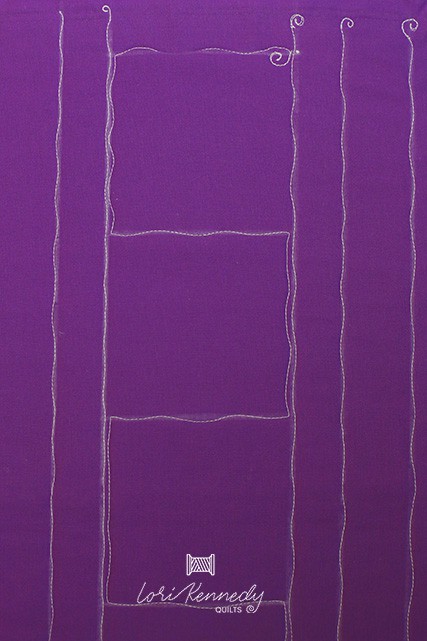
Using your favorite marking tools, (More on marking coming in Lesson 14) mark the quilt sandwich as above.
I always begin by marking the center of the fabric and add marking lines out from the center. For example to mark the quilt above:
- Mark the center line.
- Draw lines two inches away from the center line (to create a four inch section).
- Add lines one inch away from these lines.
- Mark lines one inch away from the one inch border.
- Rotate the quilt and add the four inch sections in the center.
Stitch the Vertical Lines
Note-In the above diagram, the marked lines are drawn in black and the stitching lines are white.
Using contrasting color, heavy weight thread, stitch the vertical lines.
Important!!! The hardest thing to free motion stitch is a long, straight line–so don’t even try. Stitch wavy lines over the marked lines!
To prevent the layers from distorting, follow the stitching order in the diagram.
Stitch the right sided vertical lines from top to bottom. Knot off at the bottom of each row.
Flip the quilt so the bottom is now on top and stitch the remaining three lines, again knotting off after each row.
Stitch the center Squares
Starting on the top, stitch the squares.
Stitch the horizontal line, and closely echo stitch the vertical lines. (One side of each square will have a double line of stitching.)
The Framework
That’s it! We now have a framework to fill in with motifs!
If you are ready, fill in the center squares with Flower Power and The Square Flower. (We will stitch the borders next week–Lesson Nine)
Or wait until the end of the week–I will be demonstrating variations of the motifs.

Divide and Conquer Design
The basic framework is a blank canvas for adding a wide variety of motifs. It is much easier to design a quilt or border when it is subdivided!
Try subdividing a wide quilt border into small rows or change a long strip into a series of squares. Then look through your workbasket of motifs for ideas to fill these smaller sections.
Design Ideas
While I’ve used Flower Power and The Square Flower motifs, use your vinyl overlay to try other motifs.
Subdivide the squares into triangles for even more design options.
Piece the quilt above, using solids or a combination of solids and prints.
Create a longer table runner to fit your table. Consider increasing the size of the central squares and the side borders proportionally.
YOUR Design
What about YOU?
Do YOU have another motif you’d like to try?
Are you inspired to piece a small quilt?
Do YOU have a wide border in a quilt that would benefit from subdividing?
We’d LOVE to hear!
Building quilt frameworks in Minnesota,
Your Quilting Carpenter,
Lori-the-Builder

PS…All tutorials, images and information are the property of Lori Kennedy Quilts and are intended for personal use only. Feel free to re-blog, pin or share with attribution to LKQ. For all other purposes, please contact me at Lori@LoriKennedyQuilts.com. Thank you!
PPS...More Free Motion Machine Quilting 1-2-3 has a Troubleshooting Guide on page 36
Visit my Etsy shop: LoriKennedyShop for all of my books! They are ALL bestsellers!
